Using either our GMapCreator or any other Google Mapping application it is possible to create some stunning maps that would look good in either poster or large print format.
This tutorial provides a simple method to carry out multiple screen grabs and image stitching to create high resolution output from Google Maps for such purposes.
Requirements:
1) A copy of a screen capture program that allows you to simply grab a ‘Window’ view, we recommend SnagIt by TechSmith, which is one of the best image capture systems out there and available for a 30 day fully functional trial.
2) PtGui – probably the most accomplished image stitching program on the market and again available as a trial or at 79 Euros for the full version.
The concept is simple, screen resolutions are generally too low to capture an image suitabe for use in large print formats, as such if you capture multiple zoomed in views and then stitch each image to recreate an overview you can obtain a much higher resolution output.
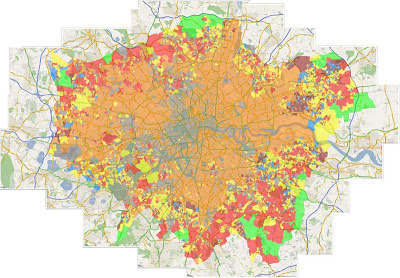
For this tutorial we used our London Super Output Areas Classification sample.
Step 1:
Start at the top left hand corner of your chosen map and zoom in so you can start to see road names, this will differ according to your required scale but it acts as a guide for the level of zoom required.
Step 2:
Open SnagIT or your preferred image capture software and set it to capture the map window area. Capture your first screen shot and save it as screen1.png or such like.
Step 3:
Go back to Google Maps and move the map over to the right leaving approximately 25% of the first screen shot still in view, this is the overlap which will be used to stitch the images. Capture your next screen shot and save as screen2.png.
Step 4:
Repeat Step 3 until you have captured your entire image, our London view took 33 separate windowed views, you will now have a series of images similar to ours pictured below:
 Step 5:
Open PtGui and click ‘Load Images’ PtGui will load the images in. To stitch them into the final map you need to first align each screen grab according to their overlap – click ‘Align Images’, once this process is complete you will be presented with a preview similar to our two outputs pictured below:

 Step 6:
Once you have previewed your map simply click ‘Create Panorama’ and export at your required size, we chose the ‘Maximum Size’ for our scene of 5990×4170 pixels.
Creating the panorama will take approximately 30 minutes according to the number of screen grabs and machine used, our final .Tif came in at 71Mb which provides a high quality print on A1 paper.
Note that all copyright and image credits should be reinserted into the final image as the stitching process blends out logos and overlays.
Let us know how you get on….
 Our experiments with weather data in Second Life continue, this time we have a couple of global maps in our space on Second Nature Island displaying temperature, rainfall, wind speed, barometric pressure and humidity round the world.