Welcome to the second part of the tutorial aimed at providing a step by step guide to importing models into the Oblivion Engine. Part 1 detailed the setting up of your first environment, leaving you with an empty flat plain of land on which to import models as we illustrate in the YouTube movie below:
There are a number of newly emerging paths into Oblivion – most notably via the free version of Google SketchUp and Blender, we will be covering these over the coming weeks. This tutorial is aimed at exporting from SketchUp Pro to 3D Max and finally into Oblivion although any import method into 3D Max will work.
For this tutorial you will require:
1) SketchUp Pro – A fully functional 8 hour version can be downloaded from here.
2) 3D Studio Max – A 30 Day fully functional trial can be downloaded here.
3) Nif Tools Exporter for 3DMax – Blender and Maya are also available from here.
4) Convim – A image conversion package to convert files to the .dds format allowing you to import textures. Download via the Convim site.
5) A 3D Max script to change image settings – Part of the BlurScripts pack which can be downloaded here (zip file).
In our case we will be converting our model of the Quad at University College London to Oblivion – this is used as an example due to it high number of textures allowing us to detail how to process complex models:
 Step 1
Open or create your model in SketchUp and export to the .3DS format. Ensure that the model is exported as a single object with generate cameras unticked.
Step 2
Download the Nif Tools Exporter for 3DMax and extract the two files – NifPlugins.dlu to the 3D Max Plugins directory and MaxNifTools.ini to the Max Plugcfg directory.
Step 3
Download the Blur Scripts file and extract the folder ‘BlurScripts’ into your Max Scripts directory.
Step 4
Import your model into 3D Max choosing to ‘Completely replace current scene’. You should see your model within 3D Max:

Step 5
Make sure your model is grouped into a single mesh. If not group your object and then right click ‘Convert to Editable Mesh’.
Step 6
We need to find and replace all the texture file names within 3D Max to the .dds extension (the format that imports into Oblivion). Click ‘MaxScript’/’RunScript’ from the top tool bar. Navigate to the BlurScripts folder and select ‘ChangeBitmaps’.

In our case we want to change .jpg to .dds for the files we will create later using Convim. Type .jpg and .dds into the relevant dialogue boxes as pictured above and click ‘Change Bitmaps’.
Step 7
Export the file in Nif format – Click ‘FileExport’, select File Type Netimmerse.Gamebryo .kf .nif. Navigate to your Oblivion folder and then onwards to datameshes. Type in your model name, in our case UCLQuad.Nif and click ‘Save’. An export box will appear as pictured below:

Select the options as pictured and click ‘Export’. You model is now saved in the .nif file format ready for import into Oblivion.
Step 8
Before we import into Oblivion we need to convert the texture files to .dds format. Open Convim and select your model texture location on the left using ‘All’. The file conversion should be set to DDS DXT1 Texture with the folder path to OblivionDataTextures as pictured below:
 Click ‘Convert’ – you now have the model and the textures in the correct format ready to import.
Step 9
Open the Elderscrolls Scrolls Construction Set and select ‘FileData’. We will be using the files created in Part One of this tutorial – in our case we created DigitalUrban.esp. Firstly double click Oblivion.esm and DigitalUrban.esp (or your file name) a cross will appear next to the files. With your file name highlighted click ‘Set as Active File’ this ensures that your world loads correctly into the construction set. Click ‘OK’ and your world will load.
Step 10
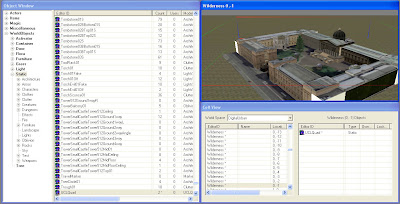
All we now need to do is simply open our World Space and import a new object. In Cell View scroll down until you find your worlds file name – Select it (again in our case Digital Urban) and double click in Cell1 where we will see the tree we placed in the first part of the tutorial. Double click the tree and then click the ‘Lightbulb’ icon in the top tool bar to ensure you can see it.
You screen should now look as illustrated below:

In the Object Window – on the left – select ‘Static’ and right click on any object name in the list, Select ‘New’ and type in a ID into the option box,
in our case UCLQuad. Click ‘Add Nif File’ and choose your model saved out of 3DMax. Click Ok.
The model is now ready to be added to the scene.
Step 11
Scroll down the list until you find your newly created ID file – click and drag it into the render window next to your tree. You model will now appear fully texture mapped into the editor:
 Finally – Click ‘Save’.
Step 12
Launch Oblivion – you are now ready to view your world. Select ‘Data Files’ from the Oblivion start screen. A menu will appear allowing you to load your new world. Select ‘Oblivion.esm’ and ‘YourWorldName.esp’ – ours is DigitalUrban.esp. Click ‘OK’ and Play’ from the main menu.

The YouTube Movie below demonstrates our final world created by following the above steps:
Note that when the world first loads the graphics are flicking and the sky is displaying errors.
This is easily fixed by:
Step 13
Press the key next to 1 on most keyboards labelled ‘¬’ or ‘~’ this allows console commands to be entered. Type ‘TS’ and then ‘Press Enter’ now repeat and you will see that the sky is now correctly turned on. There are a number of commands you can use in this mode to turn functions such as Flying, God Mode and Weather Effects on and off, see GameSpots guide for a full list.
Step 14
Press ‘T’ to allow you to advance in time – towards daylight, select 10 hours.
Your world is now complete and navigable within the Oblivion Engine. Use W/S to move forwards and backwards, A/D to move left and right. Press ‘R’ for a third person viewpoint.
We hope that the path from the first movie in the tutorial towards the image of the Quad in SketchUp and finally the movie of the Quad in Oblivion makes the point of how powerful game engines can be for visualisation…