With the focus of this blog on the third dimension it is sometimes easy to forget how powerful two dimensional visualisation can be. The sticking point to social scientists is often the difficulty involved in making clear and understandable visualisations – at which point Many Eyes comes to hand a fantastic site where users openly share data and visualise.
The diagram below represents a Topographic View of the London Underground:
A vector based version can be viewed on the Many Eyes site which you can either comment on, manipulate or more importantly download the raw data and make your own visualisation.
Sometimes you just stumble on a great site and Many Eyes is definatly one of those times.
This tutorial is aimed at providing a clear and easy to follow path through the often confusing route of using the Oblivion Game Engine for visualistion.
Oblivion is an impressive engine and once you have completed the tutorial it should become second nature to go from SketchUp/3D Max to real-time visualisation with dynamic lighting and weather effects.
Due to the nature of the tutorial we have divided it into two parts. The first is aimed at setting up the level editor, known as the Elder Scrolls Construction set, and creating your first world. The second part provides a walk through from SketchUp and 3D Max into the environment you will of created by the end of this post. More information and guides can be found at the Elder Scrolls Wiki.
Launch the Elder Scrolls Construction Kit from the Bethesda Softworks link in your Windows ‘All Programs’ list. Your screen will look similar to the image below.
Step 2
Select ‘File’ then ‘Data’ and load Oblivion.esm from the list. This loads all of the object sets and the environments from the game into the construction set.
Creating Your World
Step 1
Select ‘Worlds’ then ‘World Spaces’ from the top menu bar.
Step 2
Right Click on any of the World Names in the list under ‘Editor ID’, Select ‘New’
Step 3
Name your world in the dialogue box – we used DigitalUrban. Select the following options as per the image below (click for larger version). In short – Sharable Data ‘Clear Climate’, Usable Dimensions ‘X=3 Y=3’, Tick Oblivion World Space and Small World.
Once the options are selected, Click ‘OK’.
Step 4
Your World is now named and created ready to select as a World Space. Click the drop down box in the Cell View/World Space and select your World – in our case DigitalUrban as pictured below.
Step 5
Double Click ‘Wilderness’. You will now have a list of cells, all named Wilderness and a purple screen in the soon to become 3D view:
Making a Landscape to Build On
We now have a defined but empty world, to build or import objects we need a flat plain of land. Oblivion is able to display complex landscapes, however for our application we simply require space to visualise.
Step 1
Select ‘World’ then ‘Heightmap Editing’ and your world name from the pop up dialogue box – this opens to Heightmap Editing Tool.
Step 2
To create a flat plain set both ‘Frequency’ and ‘Amplitude’ to 1 and ‘Base Offset’ to 5000. Click ‘New Seed’ and then Click ‘Generate’. The construction set will now create an even height map according to the height indicated in the Base Offset – in our case 5000 and a resulting blue fill.
To create a mountainous landscape change the numbers in Frequency and Amplitude. Your Heightmap should now look as per the image below:
Click ‘Save’, wait for the editor to complete the process and then close the height editor – your terrain to build on is now complete.
Your First Object
We now need to carry out a few steps to make sure we know what ‘cell’ we are building in and to ensure that the relevant cell is selected.
Step 1
Rename the first cell on the list – currently called Wilderness – Click once on ‘Wilderness’ and wait, you will now be able to rename the cell, we used the name ‘Cell1’
Step 2
We need to make sure the 3D window is dark green and not purple – if it is purple double click on any cell and then double click back on Cell1. This will make sure it is selected.
Step 3
The world is currently on the dark side – Click the ‘Lightbulb‘ icon in the top bar. The 3D window will now turn a lighter green highlighting the grass in Cell1.
Step 4
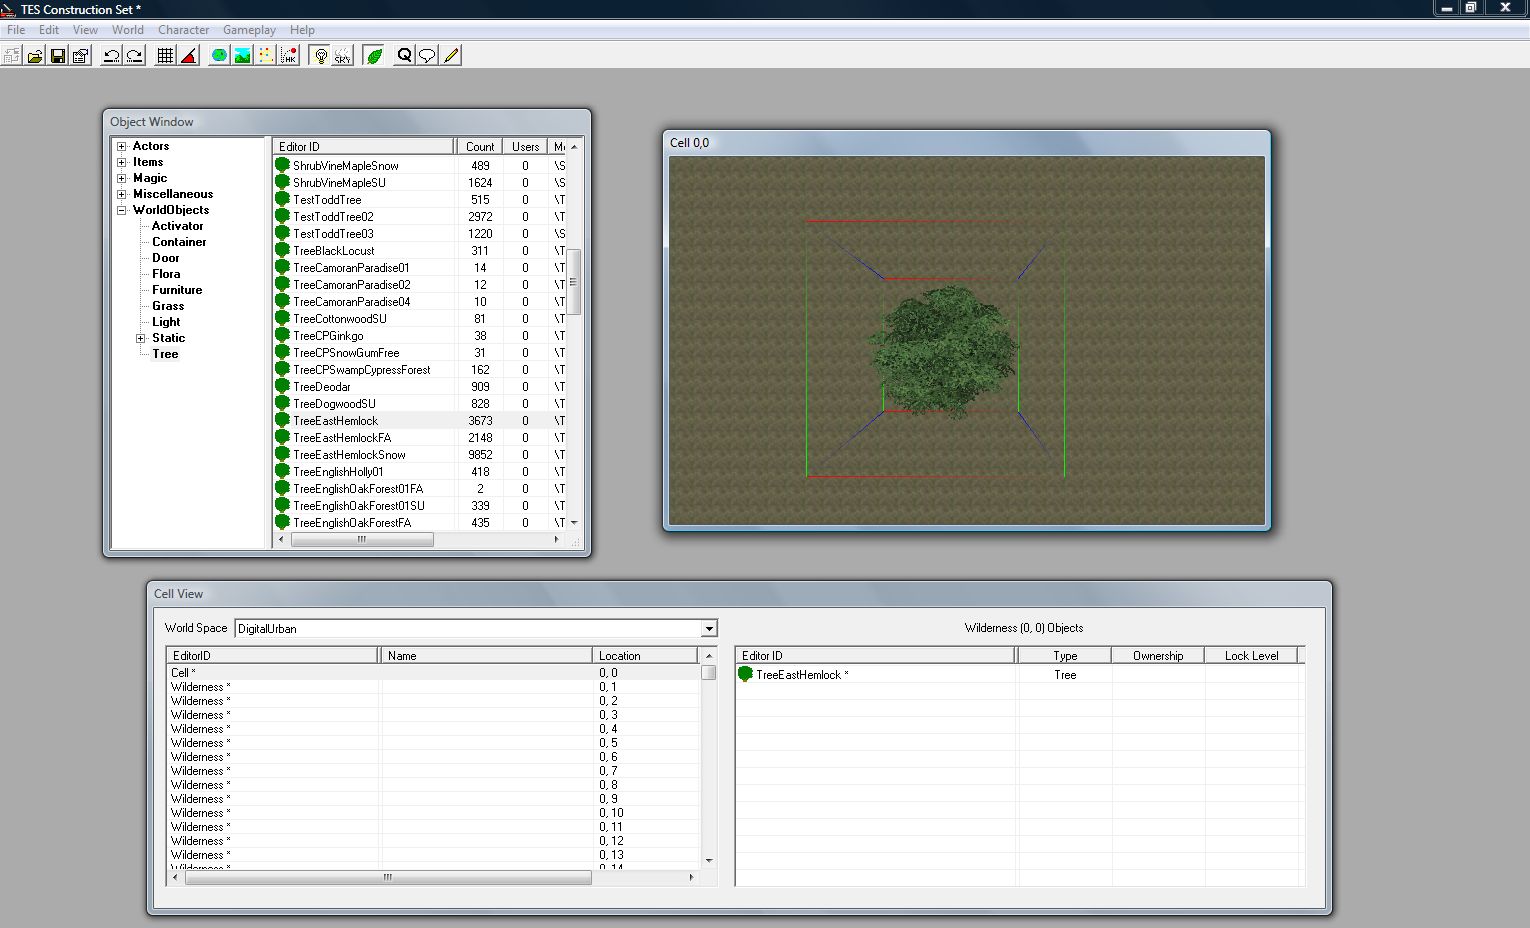
In the Object Window select ‘World Objects’ and the ‘Trees’ you will see a list of trees that you can add to your world. Select any tree from the list and ‘Click and Drag’ to the 3D Window. We selected ‘Tree EastHemlock‘. Your tree will now be floating above the world as pictured below:
To make the tree fall to the ground ‘Press F’. You can now take some time to get used to the 3D navig
ation in the window. Use the Mouse Scroll Wheel to Zoom and Out, Hold Down Shift and Move the Mouse to Rotate. Click on the Tree Icon in the Cells List to jump back to an overview of the object.
Any object from the ‘Static’ objects list can also be dragged into the window. This is how we are going to add our import from Sketchup/3D Max in part 2.
Save your world by clicking the ‘Save Icon’ and give your world a logical name, we used digitalurban.esp
Constuction of your first world is now complete, close the Elder Scrolls Construction Set.
Viewing Your World in Oblivion
There are now just a couple of steps to take to enable Oblivion to load up your new world rather than the default game.
Step 1
Go to the folder – ‘My Documents’/’My Games’/’Oblivion’ and open Oblivion.ini in either Notepad or Wordpad. We are now going to edit the file to ensure Oblivion loads our new world.
Make three changes to the Oblivion.ini file – add your Starting Cell name, in our case Cell1, your Starting World name and the name of your file in STestFile10=, in our case again digitalurban.
Save this file.
Step 2
Launch Oblivion – you are now ready to view your world. Select ‘Data Files’ from the Oblivion start screen. A menu will appear allowing you to load your new world. Select ‘Oblivion.esm’ and ‘YourWorldName.esp’ – ours is DigitalUrban.esp. Click ‘OK’ and now Click ‘Play’.
The YouTube Movie below demonstrates our sample world created by following the above steps:
Note that when the world first loads the graphics are flicking and the sky is displaying errors.
This is easily fixed by:
Step 1
Press the key next to 1 on most keyboards labelled ‘¬’ or ‘~’ this allows console commands to be entered. Type ‘TS’ and then ‘Press Enter’ now repeat and you will see that the sky is now correctly turned on. There are a number of commands you can use in this mode to turn functions such as Flying, God Mode and Weather Effects on and off, see GameSpots guide for a full list.
Step 2
Press ‘T’ to allow you to advance in time – towards daylight, select 7 hours.
Your world is now complete and navigable within the Oblivion Engine. Use W/S to move forwards and backwards, A/D to move left and right. Press ‘R’ for a third person viewpoint.
In Tutorial 2, available shortly, we will export an object from SketchUp and 3D Max directly into our new world. You can view some SketchUp/3D Max examples so far from our previous post.
This tutorial is aimed at providing a clear and easy to follow path through the often confusing route of using the Oblivion Game Engine for visualistion.
Oblivion is an impressive engine and once you have completed the tutorial it should become second nature to go from SketchUp/3D Max to real-time visualisation with dynamic lighting and weather effects.
Due to the nature of the tutorial we have divided it into two parts. The first is aimed at setting up the level editor, known as the Elder Scrolls Construction set, and creating your first world. The second part provides a walk through from SketchUp and 3D Max into the environment you will of created by the end of this post. More information and guides can be found at the Elder Scrolls Wiki.
Launch the Elder Scrolls Construction Kit from the Bethesda Softworks link in your Windows ‘All Programs’ list. Your screen will look similar to the image below.
Step 2
Select ‘File’ then ‘Data’ and load Oblivion.esm from the list. This loads all of the object sets and the environments from the game into the construction set.
Creating Your World
Step 1
Select ‘Worlds’ then ‘World Spaces’ from the top menu bar.
Step 2
Right Click on any of the World Names in the list under ‘Editor ID’, Select ‘New’
Step 3
Name your world in the dialogue box – we used DigitalUrban. Select the following options as per the image below (click for larger version). In short – Sharable Data ‘Clear Climate’, Usable Dimensions ‘X=3 Y=3’, Tick Oblivion World Space and Small World.
Once the options are selected, Click ‘OK’.
Step 4
Your World is now named and created ready to select as a World Space. Click the drop down box in the Cell View/World Space and select your World – in our case DigitalUrban as pictured below.
Step 5
Double Click ‘Wilderness’. You will now have a list of cells, all named Wilderness and a purple screen in the soon to become 3D view:
Making a Landscape to Build On
We now have a defined but empty world, to build or import objects we need a flat plain of land. Oblivion is able to display complex landscapes, however for our application we simply require space to visualise.
Step 1
Select ‘World’ then ‘Heightmap Editing’ and your world name from the pop up dialogue box – this opens to Heightmap Editing Tool.
Step 2
To create a flat plain set both ‘Frequency’ and ‘Amplitude’ to 1 and ‘Base Offset’ to 5000. Click ‘New Seed’ and then Click ‘Generate’. The construction set will now create an even height map according to the height indicated in the Base Offset – in our case 5000 and a resulting blue fill.
To create a mountainous landscape change the numbers in Frequency and Amplitude. Your Heightmap should now look as per the image below:
Click ‘Save’, wait for the editor to complete the process and then close the height editor – your terrain to build on is now complete.
Your First Object
We now need to carry out a few steps to make sure we know what ‘cell’ we are building in and to ensure that the relevant cell is selected.
Step 1
Rename the first cell on the list – currently called Wilderness – Click once on ‘Wilderness’ and wait, you will now be able to rename the cell, we used the name ‘Cell1’
Step 2
We need to make sure the 3D window is dark green and not purple – if it is purple double click on any cell and then double click back on Cell1. This will make sure it is selected.
Step 3
The world is currently on the dark side – Click the ‘Lightbulb‘ icon in the top bar. The 3D window will now turn a lighter green highlighting the grass in Cell1.
Step 4
In the Object Window select ‘World Objects’ and the ‘Trees’ you will see a list of trees that you can add to your world. Select any tree from the list and ‘Click and Drag’ to the 3D Window. We selected ‘Tree EastHemlock‘. Your tree will now be floating above the world as pictured below:
To make the tree fall to the ground ‘Press F’. You can now take some time to get used to the 3D navig
ation in the window. Use the Mouse Scroll Wheel to Zoom and Out, Hold Down Shift and Move the Mouse to Rotate. Click on the Tree Icon in the Cells List to jump back to an overview of the object.
Any object from the ‘Static’ objects list can also be dragged into the window. This is how we are going to add our import from Sketchup/3D Max in part 2.
Save your world by clicking the ‘Save Icon’ and give your world a logical name, we used digitalurban.esp
Constuction of your first world is now complete, close the Elder Scrolls Construction Set.
Viewing Your World in Oblivion
There are now just a couple of steps to take to enable Oblivion to load up your new world rather than the default game.
Step 1
Go to the folder – ‘My Documents’/’My Games’/’Oblivion’ and open Oblivion.ini in either Notepad or Wordpad. We are now going to edit the file to ensure Oblivion loads our new world.
Make three changes to the Oblivion.ini file – add your Starting Cell name, in our case Cell1, your Starting World name and the name of your file in STestFile10=, in our case again digitalurban.
Save this file.
Step 2
Launch Oblivion – you are now ready to view your world. Select ‘Data Files’ from the Oblivion start screen. A menu will appear allowing you to load your new world. Select ‘Oblivion.esm’ and ‘YourWorldName.esp’ – ours is DigitalUrban.esp. Click ‘OK’ and now Click ‘Play’.
The YouTube Movie below demonstrates our sample world created by following the above steps:
Note that when the world first loads the graphics are flicking and the sky is displaying errors.
This is easily fixed by:
Step 1
Press the key next to 1 on most keyboards labelled ‘¬’ or ‘~’ this allows console commands to be entered. Type ‘TS’ and then ‘Press Enter’ now repeat and you will see that the sky is now correctly turned on. There are a number of commands you can use in this mode to turn functions such as Flying, God Mode and Weather Effects on and off, see GameSpots guide for a full list.
Step 2
Press ‘T’ to allow you to advance in time – towards daylight, select 7 hours.
Your world is now complete and navigable within the Oblivion Engine. Use W/S to move forwards and backwards, A/D to move left and right. Press ‘R’ for a third person viewpoint.
In Tutorial 2, available shortly, we will export an object from SketchUp and 3D Max directly into our new world. You can view some SketchUp/3D Max examples so far from our previous post.
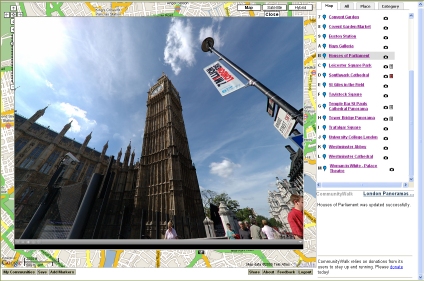
Linking panoramas with Google Maps has been a aim of many panorama creators – we have added overlays within Google Maps via Quicktime, complete with interaction – but its always nice to have a marker showing where you are looking (see our Google Map Panorama Post for a working example, as pictured below).
Map Movin 360 takes this a stage further by linking panoramic video and Google Maps, the result is the ability to pan around the video with Google Maps updating according to your viewpoint.
Map Movin 360 is well worth a look – it would be interesting to see if the same could be done with QuickTime panoramas or the emerging flash panorama viewers.