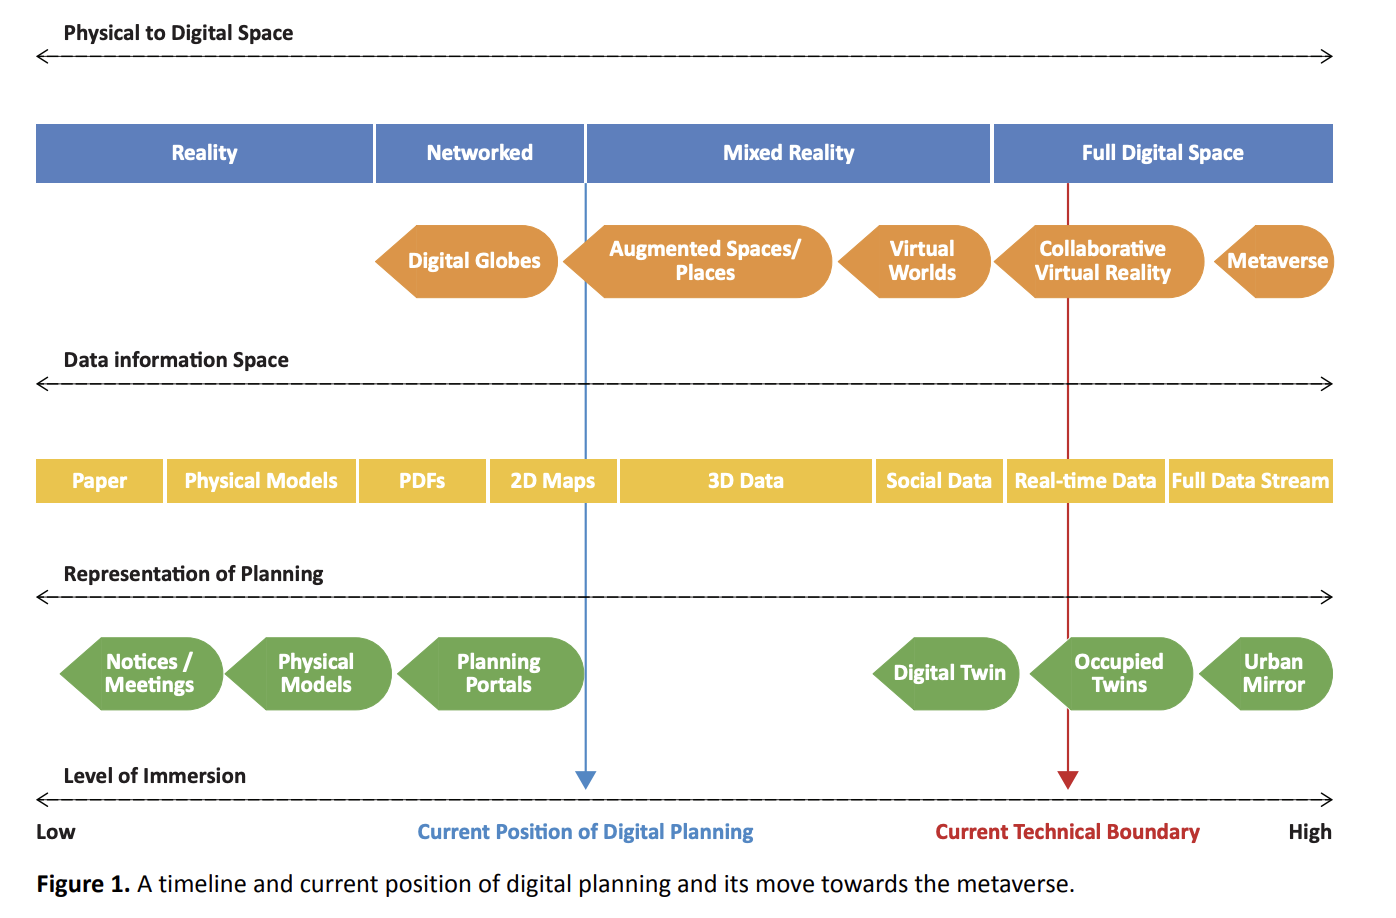
3D Printing a Radiation Shield for the Weather Flow Air

By Posts No Comments
Weather Flow Shield – Fusion 360 Model Render

The Weather Flow ‘Smart Weather Station‘ is arguably one of the most innovative weather sensors on the market. Launched via a kickstater campaign in 2017, the system is now shipping to backers and will be made available for general sale shortly.

Air, Sky and Breathe

The system consists of two current hardware modules – the Air and Sky with a third unit – Breathe focusing on air quality arriving at a future date. The Air (pictured above left) measures Temperature, Pressure, Humidity and Lightning. The Sky unit (above middle) measures wind (via ultrasonic sensors), rain (haptic sensors), Solar Radiance and Solar UV. 

Sensor data refreshes every 3 seconds via either the Weather Flow app (see smartweather.weatherflow.com/share/2701/grid for our data feed) or via a dashboard powered by various 3rd party applications.

Local Weather Data Dashboard

Placing temperature and humidity in the field is not as easy as simply putting a device outside. It needs to be suitably shielded from the sun and rain as well as being at a set height (1.25m) to reduce heating from the ground. High end stations often use a ‘Stevenson Screen’ to shield instruments and to comply with international measurement standards. 

Typical Stevenson Screen Construction

Such screens are expensive to buy and often impractical for home based weather stations. As such we decided to model and 3D print our own shield for the Weather Flow Air.

Modelled using Fusion 360 it is designed to be made on a standard 3D printer, apart from the screws required to fix it to a post. We used the Ultimaker 3.

Model Rendered Fusion 360

The model consists of 6 separately designed parts – top and bottom mounts, middle sections,  rods, nuts and spacing washers (again all printed) – and is designed to be easy to print and assemble. Everything slides into place without any need for gluing or fixing.

Assembling the Shield

Each part was sanded (1000 and 400 grit), primed and sprayed with gloss white paint – although this is not an essential, it can simply be 3d printed. The Weather Flow air sits inside and the parts act as a shield against radiation and the sun.

All the parts are available on Thingiverse, Weather Flow makes its data available via UDP, opening up opportunities to link to systems such as Node Red or any number of data displays/home hub devices. We will have more of that in future posts.

Bottom up view from Fusion 360

Btw – Digital Urban is back, its been a long time since the last post – with a focus on connected environments, sensors and sensor validation, data visualisation and 3D systems its good to be back online –  after a long stint as Head of Department (and various other things) at the Centre for Advanced Spatial Analysis, University College London.


Streaming Urban Data – YouTube Live

By Posts One Comment

The increasingly availability of bandwidth along with advances in computer hardware and Internet services is making it possible to stream HD content, live from multiple places. Traditionally the first port of contact for urban data is a web page and with that comes various issues of compatibility and the ability to communicate live urban data within a singe interface. The CASA city dashboard (citydashboard.org) was developed over 4 years ago and represented the current state of play in live data.

Citydashboard.org

Citydashboard


Yet city data should perhaps be a true ‘window on the world’ and with this comes the need for a streaming video with the potential to overlay data. As ever on digital urban we use our live weather feed for prototyping systems, as its a data set that is easy to hand and also provides a range of display options.
Weather Dashboard

Weather Data Dashboard


Our weather dashboard provides data updates every 2 seconds from our Davis Pro station on the roof off Tottenham Court Road, London. It includes live graphs and gauges (via highcharts) as well an historical view of data, yet the traditional webcam view of the actual physical view of the data has always been lacking. Streaming HD video content onto the web, 24 hours a day and in a format accessible across multiple platforms has until now been problematic. This is where YouTube Live comes in, currently in beta, the system allows a simple feed from a webcam (in our case a Logitech 930e) to be streamed live, along with additional overlays to provide realtime condition updates. It is not a case of simply pointing you camera to YouTube however, the encoding needs be carried out on the host machine and then streamed to YouTube for distribution. There are a number of options (see YouTube Encoding), having tried them all out we settled on Xsplit as the best current system:
Encoding and Overlaying Data

Encoding and Overlaying Data


Our stream runs at 720p, 30fps with an HTML overlay taken directly from the main weather landing page. This allows the current conditions to be viewed in realtime, the move to 30fps and HD makes a notable difference – it creates a window into the world, updating in realtime and providing a smooth, natural view of the city, you can view the stream direct below:

The stream is aimed at viewing fullscreen – 720p has its limitations but is a current balance. The system accepts a 1080p feed but the encoding machine takes a notable hit on processing power. With a 24/7 feed we opted for the balance of a smooth stream and medium demands on machine capacity. Bandwidth is of course all important, the feed is coming direct from a home based fibre option feed, offering 500mb uploads over wifi and unlimited data. It is this option that is opening up the ability to create data windows on the world and perhaps a true view of the city in realtime.

pFlow 3ds Max

Particles – 3dsMax and Lumion/Unity

By 3D Max, 3D Modelling No Comments

Particle Flow is a versatile, powerful particle system for Autodesk’s 3ds Max. It employs an event-driven model, using a special dialog called Particle View, allowing you to combine individual operators that describe particle properties such as shape, speed, direction, and rotation over a period of time into groups called events. Each operator provides a set of parameters, many of which you can animate to change particle behaviour during the event. As the event transpires, Particle Flow continually evaluates each operator in the list and updates the particle system accordingly.

pFlow 3ds Max

pFlow 3ds Max

To achieve more substantial changes in particle properties and behaviour, you can create a flow. The flow sends particles from event to event using tests, which let you wire events together in series. A test can check, for example, whether a particle has passed a certain age, how fast it’s moving, or whether it has collided with a deflector. Particles that pass the test move on to the next event, while those that don’t meet the test criteria remain in the current event, possibly to undergo other tests. The simple example pictured above details a pFlow dialogue determining the birth of particles linked to a target geometry. The particles can subsequently be baked (using pFlow Baker) into an animation timeline for simple output via .fbx, allowing import into external systems such as Unity or Lumion.

The clip above illustrates the pFlow system imported into Lumion with the addition of a scene created in CityEngine.

The Making of the CASA Oculus Rift Urban Roller Coaster

By 3D Max, 3D Modelling, Architectural Visualisation, SketchUp 2 Comments

Earlier this year CASA was invited to create a virtual reality exhibit for the Walking on Water exhibition, partnered with Grand Designs Live at London’s ExCeL. While CASA has a tendency to spend a lot of time thinking seriously about cities and data it was quickly decided that a fun and novel way to engage the 100,000 or so expected visitors would be an urban roller coaster ride using the Oculus Rift Virtual Reality headset. Oliver Dawkins, a student on our MRes in Advanced Spatial Analysis is a leading light in urban visualisation and the Oculus Rift, as such he kindly offered to lead the development. In the following guest post, Oliver (of http://virtualarchitectures.wordpress.com/) talks us through the development process….

CASA Urban Roller Coaster from Virtual Architectures on Vimeo.
The first tool chosen for this project was the Unity game engine because it provides a very simple means of integrating the Oculus Rift virtual reality headset into a real-time 3D experience. Initial tests were made in Unity with a pre-made roller coaster model downloaded from the Unity Asset Store. However, rather than simply place that roller coaster in an urban setting I wanted to create a track that would be unique to this experience and feel like it might have been part of the urban infrastructure. Due to time constraints it was not possible to model the urban scene from scratch. Instead I decided to generate it procedurally in Autodesk 3ds MAX using a great free script called ghostTown Lite.

Although I like to use SketchUp for 3D modelling wherever possible 3ds MAX was much better suited to this project as it allowed me to quickly generate the city scene, model the roller coaster track, and animate the path of the ride, all in the one software package. After generating the urban scene I used the car from the Asset Store roller coaster as a guide for modelling my track in the correct proportions.
making_of_casa_roller_coaster_02
The path of the ride through the city was modeled using Bezier splines, first in the Top view to get the rough layout and then in the Front and Left views to ensure the path would clear the buildings in my scene. The experience needed to be comfortable to users who may not have experienced virtual reality before so it was agreed to exclude loop-the-loops on this occasion. It was also important to avoid bends that would be too sharp for roller coaster to realistically follow. Once I was happy with the path I welded all the vertices in my splines so that the path could be used to animate the movement of the roller coaster car along the track later.
making_of_casa_roller_coaster_03
Next sections of track were added to the path I’d created using the 3ds MAX PathDeform (WSM) modifier. As the name suggests this modifier deforms selected geometry to follow a chosen path. Using this modifier massively simplified the process by allowing my pre-made sections of track to be offset along the length of the path and then stretched, rotated and twisted to fit together as seamlessly as possible. This was the most intricate and time consuming part of the project.
making_of_casa_roller_coaster_04
In order to minimise the the potential for motion sickness with the Oculus Rift I was careful to keep the rotation of the track as close to the horizontal plane as possible. Supporting struts were then arrayed along the path of the track and positioned in order to anchor it to the rest of the scene. When I was satisfied a ‘Snapshot’ was made of the geometry in 3ds MAX to create a single mesh ready for export to Unity. At this point the path deformed sections of track could be deleted as Unity does not recognise the modifier.
making_of_casa_roller_coaster_05
To create the movement of the roller coaster car along the track a 3ds MAX dummy helper was constrained to the path I’d created earlier. This generated starting and ending key frames on the animation timeline. The roller coaster car model was then placed on the track and linked to the dummy helper. It is possible in 3ds Max to have the velocity and banking of the dummy calculated automatically, but I found that this did not give a realistic feel. Instead I controlled both by editing the animation key frames using a camera linked to the dummy for reference. This was time intensive but gave a better result. The city scene, roller coaster and animation were exported as a single FBX which is the preferred import format for 3D geometry in Unity.
making_of_casa_roller_coaster_06
Having completed the track and animated the car it was time to assemble the final scene in Unity. First I generated a terrain using a great plugin called World Composer. This enables you to import satellite imagery and terrain heights from Bing maps to give your backdrops a high degree of realism.
making_of_casa_roller_coaster_07
The urban scene and roller coaster were then imported and a skybox and directional light were added. The scene was completed with various assets from the Unity Asset Store including skyscrapers, roof objects, vehicles, idling characters and a flock of birds.
making_of_casa_roller_coaster_09
To prepare the Oculus Rift integration the OVR camera controller asset from Oculus was placed inside and parented to the roller coaster car. In my initial tests with the Asset Store roller coaster I’d found that OVR camera would drift from the forward facing position. This would disorientate the user and contribute to motion sickness. To prevent it with a quick fix I parented a cube to the front of the roller coaster car, turned off rendering of the cube so it would be invisible, and set the camera controller to follow the cube.
making_of_casa_roller_coaster_10
In order to ensure the best possible virtual experience it is really important to keep the rendered frames per second as high as possible. As the Oculus Rift renders two cameras simultaneously, one for each eye, you need to aim to render 60 fps in Unity so as to ensure the user can expect to experience a frame rate of 30 fps.
In order to achieve this I took advantage of occlusion culling in Unity Pro which prevents objects being rendered when they are outside the camera’s field of view or obscured by other objects.
making_of_casa_roller_coaster_11
I also baked the shadows for all static objects in the scene to save them as textures which saves the processor calculating them dynamically. The only objects casting dynamic shadows are the roller coaster car and animated characters.
Finally two simple java scripts were added. The first would start the roller coaster and uclprovost3play a roller coaster sound file upon pressing the ‘S’ key. The second closed the roller coaster application upon pressing the ‘Esc’ key.
The reception of the CASA Urban Roller Coaster ride at Grand Designs Live was fantastic and I’m really pleased to have participated. It was a great project to work on and an excellent opportunity to learn new techniques in 3ds MAX and Unity. Having my first VR roller coaster under my belt I’m looking forward to building another truly terrifying one when I get the time, hopefully for the Oculus Rift DK2 which has just arrived at CASA.
On a last note I’d like to thank Tom Hoffman of Lake Earie Digital whose excellent YouTube tutorials on creating roller coasters in 3ds MAX provided a great guide through the most difficult part of this challenging project.
You can follow Oliver’s latest work at  http://virtualarchitectures.wordpress.com/…..

Close Menu

About Salient

The Castle
Unit 345
2500 Castle Dr
Manhattan, NY

T: +216 (0)40 3629 4753
E: hello@themenectar.com